Verify that the Administrative Templates installation is successful by viewing the new templates within Group Policy Management using the following steps.
- On your domain controller, select Start > Windows Administrative Tools > Group Policy Management.
- Right-click the Default Domain Policy and click Edit.
- Expand the Computer Configuration\Policies\Administrative Templates Policy definiations folder.
- You should see Office policies appear in the Group Policy Management console, as shown in Figure 4-14.

FIGURE 4-14 Verify Office Administrative Templates
- You can verify that Office policies also appear in the User Configuration\Policies\Administrative Templates folder.
- The policies can now be configured using Group Policy.
Once you have installed the Administrative Template files for Microsoft Office, you can manage Microsoft Office settings with Group Policy. Group Policy allows you to control thousands of settings by configuring Group Policy Objects (GPO) in the Group Policy Management Console and then applying the GPOs to users and devices in your domain.
In the following example, we will create a new policy to enable week numbers in the Outlook calendar using the following procedure.
- On your domain controller, select Start, Windows Administrative Tools, Group Policy Management.
- Expand the Group Policy Management tree, right-click Group Policy Objects, and click New.
- Name the new GPO User_Outlook and select OK.
- Expand Group Policy Objects. Right-click User_Outlook GPO and select GPO Status. Ensure that Computer Configuration Settings is set to Disabled.
- Right-click User_Outlook and click Edit.
- In the Group Policy Management Editor, navigate to User Configuration\Policies\Administrative Templates to view the Microsoft Office ADMX templates you imported earlier.
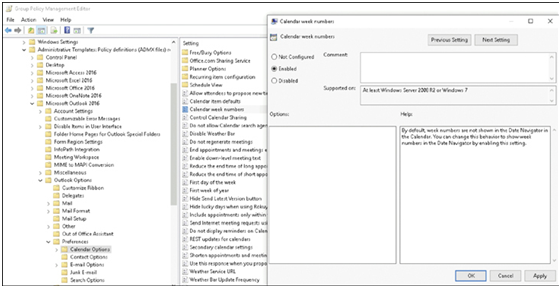
- Navigate to User Configuration\Administrate Templates\Microsoft Outlook 2016\Outlook Options\Preferences\Calendar Options and double-click Calendar week numbers.
- Select Enabled and select OK, as shown in Figure 4-15.

FIGURE 4-15 Enable the Outlook week numbers Group Policy setting
- Close the Group Policy Management Editor.
- In Group Policy Management, right-click the Organizational Unit (OU) containing the users to which you want the GPO to apply and select Link an Existing GPO.
- On the Select GPO dialog box, select the User_Outlook GPO and select OK.
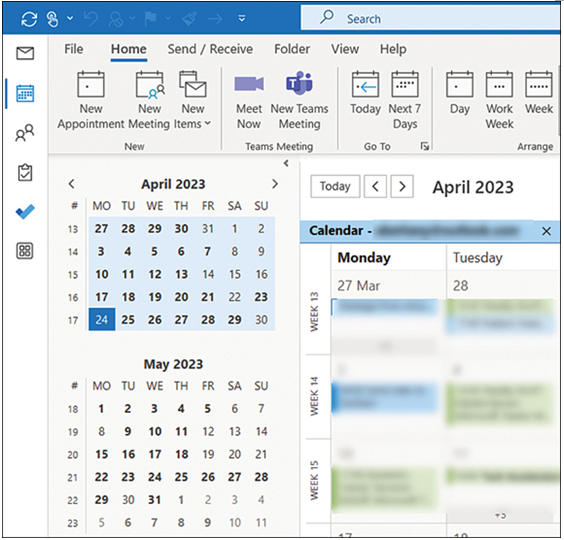
The group policy is now configured and will be applied to users within the OU when they next log in to their Windows computers. By default, Group Policy refreshes in the background every 90 minutes. You can force an individual computer to update the polices by using the gpupdate /force command from an elevated command prompt. You can then start Outlook and verify that the calendar week numbers are visible, as shown in Figure 4-16.

FIGURE 4-16 Display week numbers in Outlook
Note Microsoft 365 Apps ADMX/ADML Templates
The Group Policy settings you configure for Microsoft 365 Apps are included in the Administrative Template files (ADMX/ADML) for Microsoft 365 Apps. You configure the Microsoft 365 Apps settings using the Microsoft Office 2016 settings in Group Policy.
